
Today I won’t be linking to any files for 3D printing at home, because I still haven’t finalized the design for this project. If you just want to print the lantern as it is, send me a message through the contact information on my About page and I can give you my current draft. The reason I’m writing about an unfinished project is that it’s been an interesting learning experience for me, and I think it will be interesting to read about if you have an interest in what goes into my design process.
Why the Green Lantern?
Good question, with a simple answer. My cousin loves comic books, as do I, so when I first got my 3D printer I decided that it would be fun to make a version of the ring the Green Lantern wears. It turned out that this was a bit ambitious as a first project, since I had essentially no experience either 3D printing or 3D modelling, but the idea stuck with me and I slowly chipped away at the work required. I had to adjust my 3D printer so that it could handle the tight tolerances required in making something as small as a ring. Through experience I also learned how to design objects around the constraints of printing, and how to make a single piece from multiple printed parts.
By the time I had a ring design I was happy with, I had learned a lot, and decided that no Green Lantern ring would be complete without an actual Green Lantern to match. I began to think about how I might build a lantern that would “charge” the ring, and ended up buying glow-in-the-dark plastic to print the ring from with the idea that I would put a blacklight inside the lantern which would give it a nice glowing effect.
Designing the Ring
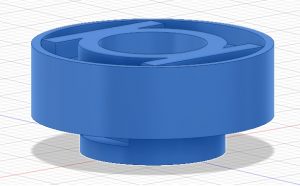
The ring design is relatively simple. I refer to the two parts of the completed ring as the ring face, and the ring ring. Thanks to comic book artists’ desire to make things simple to draw, the actual design of the Green Lantern ring is a circle and two lines. Using the basic shapes provided in Fusion360 I was able to quickly make a ring face similar to the design in the comic books. I then added a few millimeters of thickness to the ring face to make it a bit more substantial.
In order to give the ring ring a place to attach, I then added a smaller circular section to the underside of the ring face. I tried to keep this section thin enough that it wouldn’t make the ring face section uncomfortably thick, and then added a cut-out on one side for the ring ring to slide into, mirroring that cut-out to the other side so that the two pieces could be fully attached and then glued together for stability.
The ring face also has a deep circular cut-out in the middle, which is fitted inside the already existing circle in the ring face design. This cut-out is where the magnet will eventually be glued and covered. You might be asking “Why does the ring need a magnet?” The answer to that is, I needed a way to turn on the blacklight inside the lantern without any contact between the ring and lantern. The simplest way to do this was by inserting a magnetic switch inside the lantern, and magnet to trigger it in the ring.
The ring ring was designed by making a circle about the same diameter as my ring finger is, and then cutting out a section where it would fit into the cut-outs of the ring face. I then just guessed at a thickness that would make it stable enough not to just snap and thin enough not to be uncomfortable and adjusted it until I was happy with the balance between the two.
Designing the Lantern
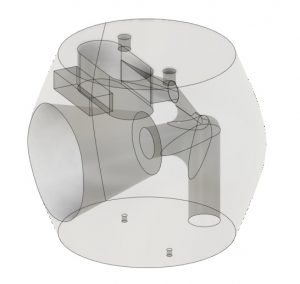
I knew from the start that any reasonably sized lantern would be too big to print in one piece. I generally try to avoid overlong prints because the longer the printer is running, the greater the chance of some minor issue causing the print to warp or break and having to start over. It isn’t a great feeling having to restart a print, but there is a large difference between restarting a three-hour print halfway in (each section of the lantern body does actually take 3-4 hours to print) and having to restart a nine-hour print halfway in.
Designing the lantern to be assembled was also helpful from a visual design perspective, because it made it much easier to create areas capable of completely hiding the electrical components. Taking advantage of the three-part structure, I was able to create a hidden recess for the magnetic switch without having to worry about designing some kind of cover.
The top section of the lantern is the simplest design, it’s a truncated cone with two holes for a handle to be inserted into, and two small pegs I use as guide posts for assembling the lantern. When attached to the middle section, it also serves to cover up the area used to hold the magnetic switch. This lets me have a nice open area to insert the switch and wiring into, making that part of assembly simple enough that it can be done entirely by hand (no tweezers needed).
The bottom section of the lantern is also a truncated cone with some major differences from the top. First it has a large hole to allow the wiring from the middle section to pass through. This allows me to keep all of my electrical connections in one place, and not have to worry about hiding more inside the middle lantern section since it’s already got a lot going on. Next it has a recess on the underside which is large enough to completely hide the battery pack, and those electrical connections. When the lantern is on a table assembled, this space means that it easily sits flush without the need for a cap on the bottom to contain everything. It also makes changing the batteries simple.
The middle lantern section has the most going on. The opening on the front face is again a truncated cone, the base of which is wide enough for a black-light (UV) LED to sit in. On the top of the middle section is an opening that allows access to the cavity where the magnetic switch sits. The reason for this cavity is that the magnetic switch has a very limited range, and so the closer it can be to the front of the lantern, the farther away the ring can be and still activate the black-light. There are also hollow tubes in the middle piece which allow for all the wires to pass through. Where the wiring tubes meet and curve, I added a gentle slope to help guide the wires smoothly down towards the base, making assembly much easier than it would be with 90-degree corners at the turns.
So What’s Left?
There is not a lot left to do on this project. The overall design is essentially finalized, but during assembly and testing some issues came to light that need to be dealt with. I also have yet to find a handle design that I am happy with and is printable, so work continues on that.
The main issue with the ring is that when I glue the powerful magnet into the center, as soon as I get near a piece of metal the ring tears itself apart. This is not ideal even if the ring is just work around the house, so I am working on strengthening the ring without making it too much larger so that it stays comfortable. Part of this is just finding a better glue for attaching metal to plastic, but I will also need to widen the ring ring to accommodate the force.
With the lantern, I have a couple of adjustments to make. I think by lowering the cavity where the magnetic switch sits I can get it even closer to the front face, and every millimeter counts for getting the lantern to light up without the ring actually having to touch it. The problem with the ring touching the lantern is that the light needs to hit the ring face in order to “charge” it and make the plastic glow. I am also considering a different type of magnetic switch, but that is something I will talk about in my next article on this project once I’ve done some testing. The other adjustment to the lantern is changing my guide post/hole system so that they fit together properly. The posts are so small that the layers of plastic don’t have time to cool before the next one is put on, and this causes drooping and oozing which leads to the posts not fitting in the matching holes. I can adjust the setting of my printer to fix this, or I can just make bigger holes. Since the holes and posts are just to help generally line up the pieces, I’m probably going to take the simpler option of using bigger holes.
That’s All for Now!
Thanks for reading through this and putting up with my overuse of the word “ring”. I hope the insight into my design process is interesting and helpful, whether it is or not feel free to contact me or leave a comment.